Git Remote Repositories
Goals
- Create a GitLab account.
- Create a remote repository.
- Push a local repository to a new remote repository.
- Check out a new repository from an existing remote repository.
- Fetch changes from a remote repository.
- Merge remote changes into the local repository.
- Push local changes to a remote repository.
Concepts
- branch
- Bitbucket
- clone
- conflict
- credentials
- diverge
- fast-foward merge
- GitHub
- GitLab
HEADmaster- merge
originorigin/master- push
- fetch
- pull
Preparation
Lesson
In a previous lesson on version control, you learned how to store your work in a local repository; and also learned that there exist “remote repositories” for teams to share, distribute, and coordinate their work. As you'll see later on in this lesson, even your local repository can be considered a remote repository if you access it from another computer (or even from another directory!). But many times a team will use a central remote repository set up solely for the teams to use for that purpose. The team may even use a commercial service to host the remote repository.
GitHub, Bitbucket, and GitLab
Most open-source (and many closed-source) projects are hosted on one of the three hosting services:
- GitHub
- The most popular service for hosting public projects, GitHub fostered a community around open-source development. GitHub is now owned by Microsoft. GitHub charges for private repositories.
- Bitbucket
- Bitbucket supports both Git and another version control system named Mercurial. Bitbucket is geared towards private projects (including corporate projects) and has less community involvement. Bitbucket now owned by Atlassian, which also produces JIRA and other tools. Bitbucket requires an account ID tied to your email, which can make it difficult to use with different companies or to change organizations.
- GitLab
- GitLab is a more recent service. Not only can you access GitLab through the public site, you can also download an open-source edition and install it on your own server. GitLab has fewer users than the other services, but is growing.
All three allow free accounts and offer similar functionality. In the end your choice comes down largely to a matter of user interface preference as well as the pricing structure of each (based upon private repositories and contributors).
Remote Repositories
The Local master Branch
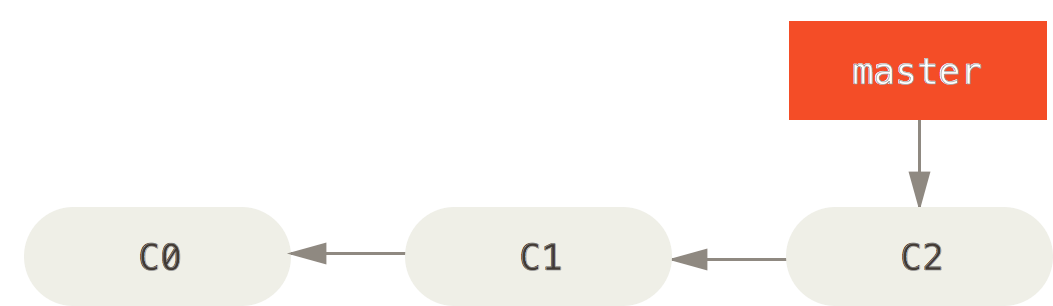
master branch in a local Git repository. (Pro Git, Second Edition)Each time you commit your work to your local repository, these commits are stored in different snapshots or "revisions" in a local repository. After several commits you will have a several revisions in a row, each pointing to the commit before it. Git also provides a pointer to the most recent comment in the sequence. By default the pointer has the name master.
Git refers to master as a branch, like the branch on a tree. In future lessons you'll learn how to create more of them and even move them around at will. For now, you can list all the current branches with the git branch command.
git branchYou also learned that there exist remote repositories for teams to share, distribute, and coordinate their work. Git will work perfectly well with a local repository without ever needing to connect to a remote repository, but even a developer working alone may wish to transfer his or her work to a remote repository on a server as a backup, or from a desktop to a remote repository on a laptop when traveling. When you want to send your latest information to the remote repository, you'll tell Git to push your master branch to the remote. Before you can push to a remote, you must first add the remote repository to Git's list of remotes.
List Remotes: git remote
To see the current remotes Git knows about for a particular repository, enter the git remote command.
git remoteAdd Remote: git remote add <remote-name> <url>
You can tell Git to add a remote to its list of remotes by using the remote add command and passing it a short name (of your choosing) to identify the remote, followed by the URL of the remote. For example, if you have a GitLab account named username and have created a project named project, you can add the GitLab project as a remote repository. In the example below, we plan to use the GitLab repository as our main repository, so we have chosen to refer to this remote as origin just as if we had cloned it from there originally.
git remote add origin https://username@gitlab.com/username/project.gitNow if you invoke git remote you'll see origin listed as a remote repository.
Send to Remote: git push <remote-name> <branch-name>
Once you have configured your project to recognize a remote repository, you can transfer your entire local repository to the remote. This is called “pushing to a remote”. You'll indicate not only the short-name of the remote, but also the name of the branch pointer that indicates where you are working. (Remember from above that, by default, your repository has a single branch pointer named master.)
If your remote repository is empty and you're pushing an entire new repository you created locally for the first time, you'll want tell Git not only to push the master branch to the remote named origin, but also to track your local master branch on the server.
git push --set-upstream origin masterAfter the initial push, in the future you can simply indicate the remote server and the local branch.
git push origin masterIf the remote repository is secure, you will at be asked to enter your account password. Then Git will transfer the master branch of your local repository (including its entire history of commits!) to the remote.
Original Remote Checkout: git clone <remote-url> [<directory>]
Instead of creating a repository from scratch on your local machine and pushing it to a new remote repository, you may wish to start your project by making a complete copy of a remote repository that already exists. This may happen if you are joining a team of developers already working on an other project, or you may simply be copying your project to your laptop so that you can work while traveling. In either case, you will clone the remote repository to a new directory, passing Git the URL of the remote repository. The example below shows how you could clone the remote repository you just pushed (above) into a directory named /my/projects/helloworld-copy.
cd /my/projects/
git clone https://username@gitlab.com/username/project.git helloworld-copy
The Remote origin/master Branch
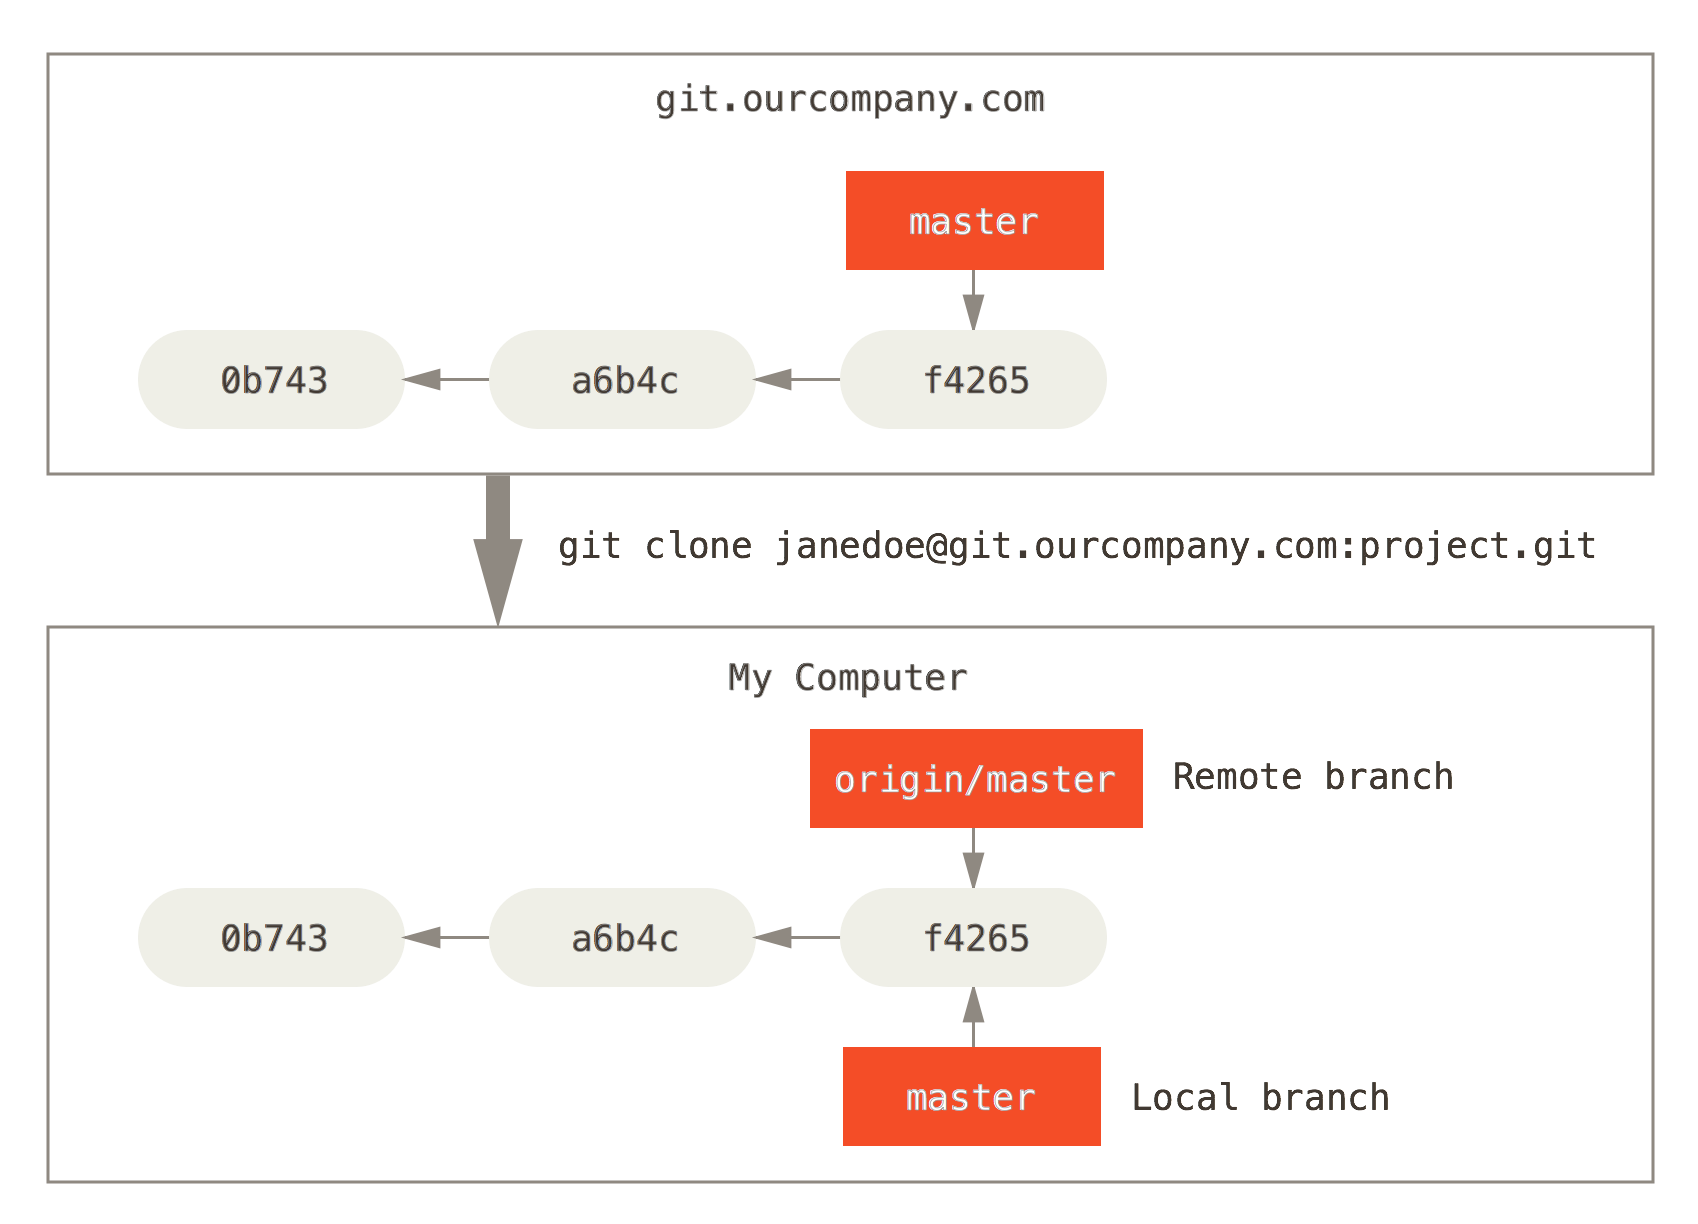
origin/master branch in a remote Git repository. (Pro Git, Second Edition)You saw above that your local repository always has a branch pointer named master indicating the next position in the sequence at which you'll make a commit. Once your project is connected to a remote server, either by pushing to a new remote repository or by cloning an existing one, your project will have a remote branch pointer named origin/master that indicates the last commit of the remote repository that is stored locally.
To list the remote branches, use the --remotes flag with git branch.
git branch --remotes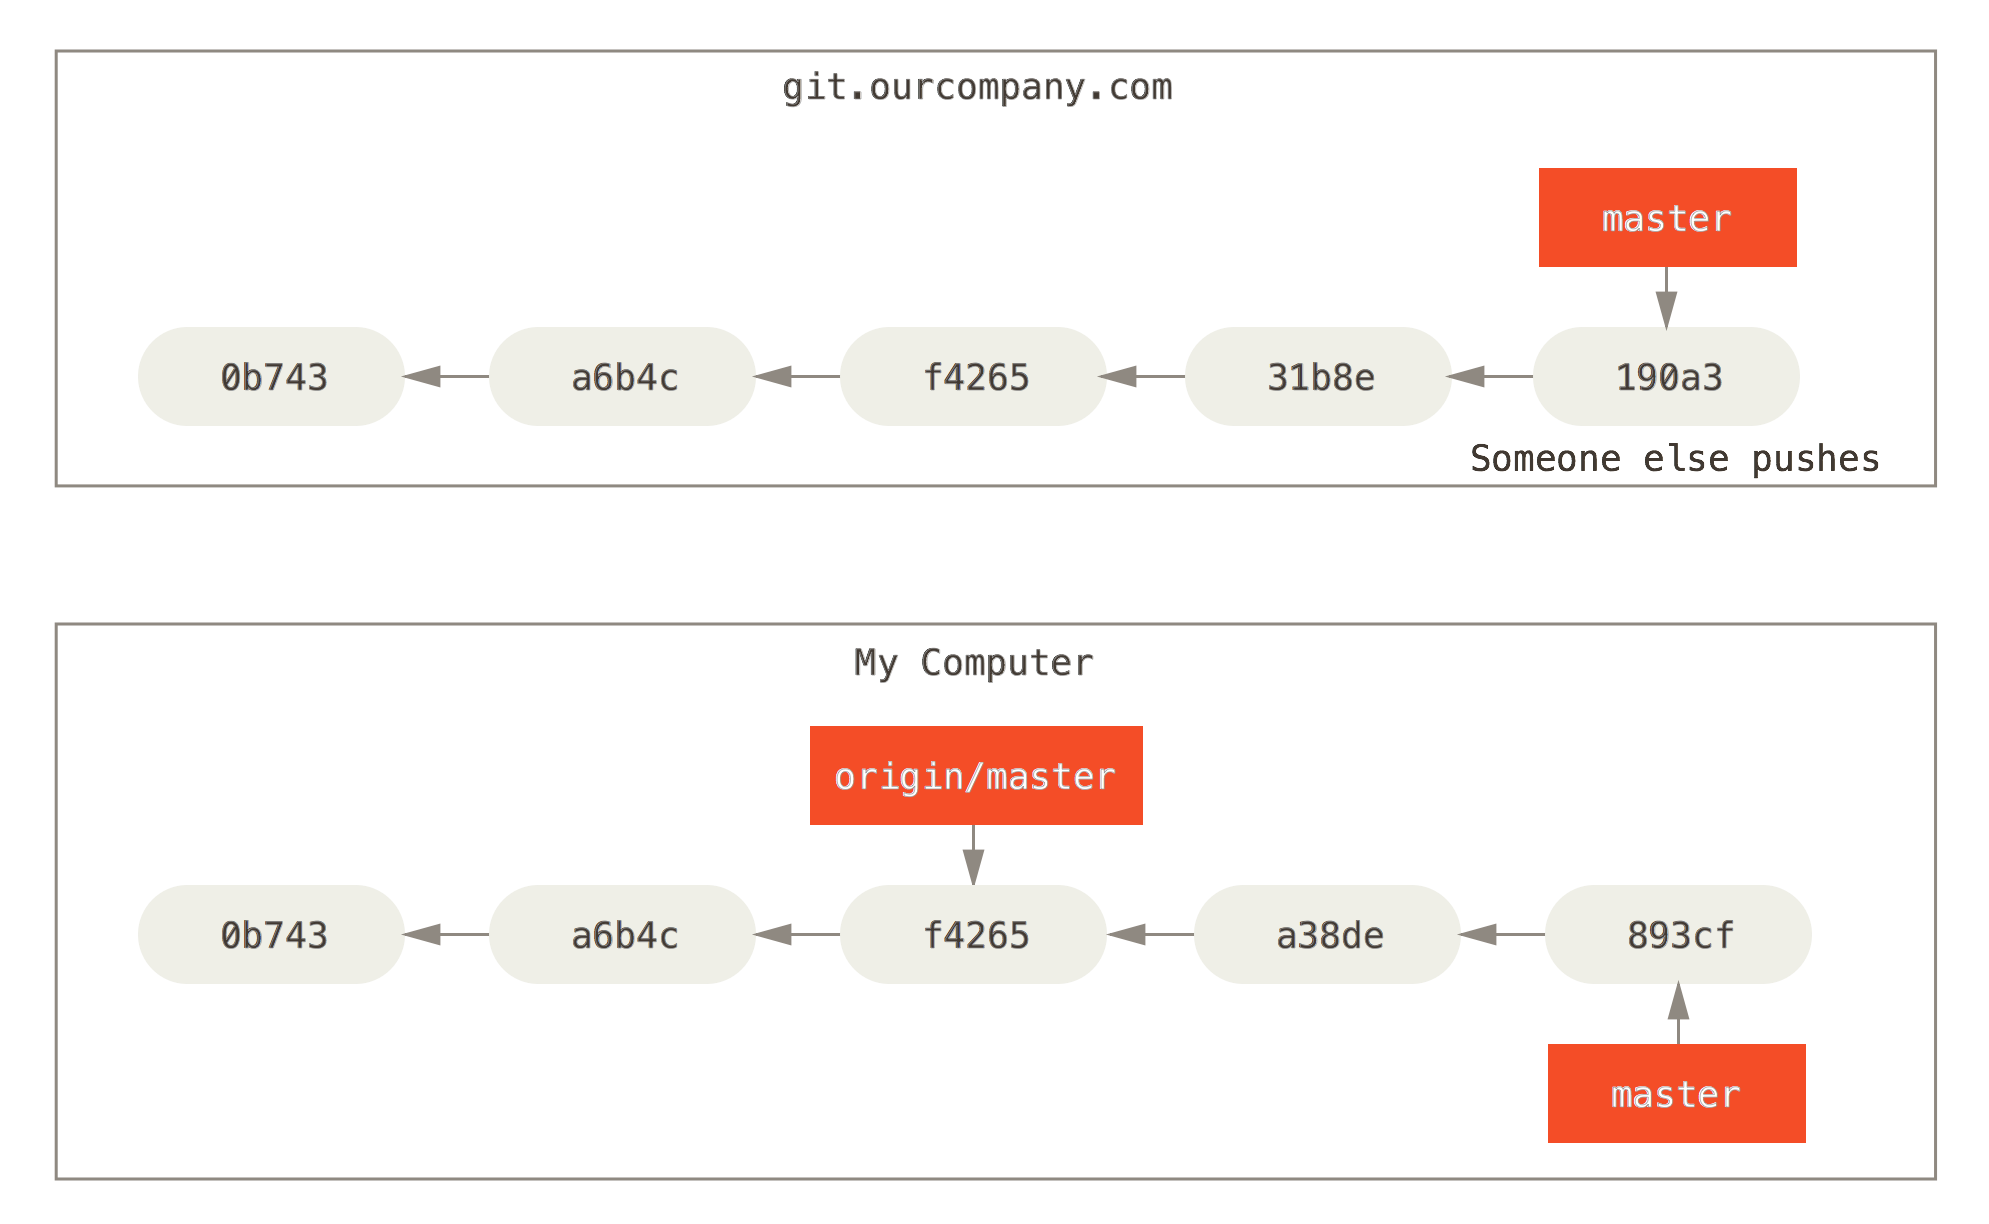
master branch with changes not yet pushed to the remote origin/master branch. (Pro Git, Second Edition)Notice that, after the original push or the initial clone, both the local master branch and the remote origin/master branches are pointing to the same commit. Your local repository and the remote repository are in sync.
But if you continue making commits locally without pushing them to the remote, your local master branch will advance beyond the remote origin/master branch. This is how Git knows that you have new commits to transfer when you do a git push.
Retrieve from Remote: git fetch [<remote-name>]
If others in your team have pushed changes to the remote repository, or if you've pushed changed from your laptop during a trip for example, you can tell Git to go fetch any new additions from the remote.
git fetch originMerge master with origin/master
Fetching does not automatically bring your local master branch pointer in sync with origin/master! It only brings down new information and updates origin/master. To bring the two in sync, you'll need to merge the new origin/master branch into your current master branch. Merging is the process of bring two branch pointers into sync so that they point to the same commit.
origin/master into the current branch.git merge origin/masterFast-Foward Merges
If you haven't made any commits to your local repository since the last time you were in sync with the remote, the new additions from origin/master will be added in front of master in the same sequence. To merge Git will merely need to bring your master pointer forward so that it points to the end of the newly added commits—the same place that origin/master points to, as a result of your recent fetch. This is called a fast-foward merge, and Git by default will always do a fast-forward merge when it can.
Automatic Divergent Merges

origin/master branch diverging from the local master branch. (Pro Git, Second Edition)On the other hand, you may have made some local commits to master, while someone else has pushed different commits to origin/master before you fetched them. In this case, the sequence of commits diverged between the new master position and the new origin/master position.
To solve this problem, Git will combine the two revisions pointed to by master and origin/master (893cf… and 190a3…, respectively, in the figure) and commit the result as a new revision, setting master to point to the new revision—essentially joining the two development streams together.
Merge Conflicts
If the remote changes at origin/master are incompatible with your changes at master, this is called a conflict. Git is unable to merge conflicts automatically, and will leave it to you to resolve the conflicts and commit a new merge revision. The files with conflicts (which Git will list for you when the merge fails) will be edited to contain merge markers indicating which variations were incompatible:
<<<<<<< HEAD
        System.out.println("How are you this afternoon?");
=======
        System.out.println("How are you today?");
>>>>>>> 65b2e16ab1f92fd60aeaf6da8bb7e3b1d162afc7
To resolve these conflicts, decide which of the variations you wish to keep. Edit the offending file(s), and when you are done, remove the lines with the <<<<<<<, =======, and >>>>>>> markers. Then just add the file(s) to the Staging Area and make a new commit as you normally would.
Fetch and Merge: git pull [<remote-name>]
Almost every time you fetch from the remote server, you will want immediately to merge any new changes from origin/master into your local master branch. Because this workflow is so common, Git has added a pull command which simply combines the actions of fetch and merge. The command syntax to pull from the server is the same as git fetch.
origin remote repository.git pull originReview
Summary
| Command | Description | Example |
|---|---|---|
| Local Repositories | ||
git init | Initializes the current directory as a Git project with a Working Area, Staging Area, and Local Repository. | git init |
git add <file> | Adds a file to the Staging Area but does not commit it to the Local Repository. The added file must be committed before the Repository is changed. | git add readme.txt |
git reset <file> | Removes a file from the Staging Area that has not yet been committed. | git reset readme.txt |
git status | Shows the status of the files in the Working Directory. | git status |
git diff [--staged] | Shows differences between the Working Directory and the Staging Area; or if --staged is included, between files in the Staging Area and the Repository. | git diff |
git commit [--all|-a] --message|-m <"log-msg"> | Commits all files in the Staging Area to the Repository, optionally first adding modified files if --all (-a) is included | git commit -m "log message goes here" |
git log [<file>] | Shows history of commit log messages for the Repository, or for a single file. | git log |
git rm <file> | Removes a file from the Working Directory and from the Staging Area. Equivalent to manually removing a file from the Working Directory and then using git add for the removed file. The removal must be committed before the Repository is changed. | git rm readme.txt |
git bundle create <file> --all | Creates an archive file of the entire history of Local Repository. | git bundle create repo.bundle --all |
| Remote Repositories | ||
git clone <remote-url> [<directory>] | Downloads a copy of an entire remote repository and installs it in a local repository. | git clone https://username@gitlab.com/username/project.git |
git remote [--verbose|-v] | Lists remote repositories | git remote |
git remote add <remote-name> <url> | Adds a remote repository and gives it a name. | git remote add origin https://username@gitlab.com/username/project.git |
git fetch [<remote-name>] | Retrieves latest changes from the remote repository, but does not merge it into current version. | git fetch origin |
git pull [<remote-name>] | Performs a combination of fetching from the remote repository and merging the retrieved commits into the current local branch. | git pull origin |
git push [--set-upstream|u] [<remote-name>] [<branch-name>|--all|--tags] | Pushes the latest commits on the named branch to the indicated remote repository, optionally setting up the branch to track the remote branch. You can also specify that all branches or tags should be pushed. | git push origin master |
| Branches | ||
git branch [--list] [--remotes|-r] | Lists all local or remote branches. | git branch --remotes |
git merge [<branch-name>] | Merges changes from another branch into the current local branch. | git merge origin/master |
Gotchas
- If you try to push to a remote and someone else has pushed their changes ahead of you, you'll need first to pull the latest changes before you can push your additions.
- Using
git fetchdoes not automatically merge changes into yourmasterbranch; you will need to do that separately with agit merge; or just usegit pullto begin with. - If you pull down changes that result in a non-fast-forward merge, remember that a new commit has been added to your local repository.
In the Real World
- No serious software development project is done without shared version control. Get used to using Git so that you can work effectively with your team.
Self Evaluation
- What are the names of two popular commercial services for hosting Git repositories? Which has developed more of a community for open source projects?
- What is the default name of the remote server?
- What are two ways to notify Git of a new remote server?
- What is a “branch”?
- What is the default name of the main local branch?
- What is the difference between
mainandHEAD? - Can
mainbe moved? CanHEADbe moved? When and how? - When you fetch information from a remote, where is it stored? What is the name of the branch pointing to this information?
- Give an example of what might result in a conflict when merging in fetched changes from a remote.
- What are the symbols Git uses to demarcate conflicts in a file?
- Once you have fixed the conflicting parts of a file, how do you notify Git that those changes have been resolved?
Task
This task consists of two parts. First push your local repository to a remote repository and keep it in sync.
- Create a remote repository for Booker on GitLab by creating a new GitLab project.
- Name the project “Booker” with the slug
booker. A “slug” is the project identifier that becomes part of its address. - Set the project visibility level to Private. Do not share your Booker repository with anyone!
- Fill in other information as desired and select Create repository.
- Navigate to the project Settings → Members and add your teacher to the project as a Reporter.
- Name the project “Booker” with the slug
- On the main project page, find the project's HTTPS remote repository URL and add the GitLab remote repository to your local Booker project.
- If you add
username@to the URL, e.g.https://username@gitlab.com/username/project.git, you will not be prompted for the user each time you access the remote repository.
- If you add
- Push the current state of your entire local repository for the Booker project to the
bookerremote repository on GitLab. - In future lessons, continue to make frequent commits to your local repository as needed for the Booker project.
- Every time there is homework related to the Booker project, be sure to push your changes to GitLab before the homework is due.
Now show that you understand how to resolve merge conflicts between master and origin/master.
- Make sure you current local repository
bookeris in sync with the remote repository. - Clone the remote
bookerrepository to a directorybooker-copythat is outside of the originalbookerproject directory. - Make a single-line edit by adding a comment
//fooin thebooker-copyrepository and push the change to the remote. - Go back to the
bookerdirectory, but before pulling any changes, make a single-line edit in the same file, on the same line, but with a different value: the comment//bar. Commit the change, but do not yet attempt to push the change to the remote. - Still in the
bookerdirectory, pull the latest changes from the remote; this will create a merge conflict. - Resolve the merge conflict by changing the comment to
//foobarand commit your changes. - Push your commits to the remote repository.
Notify your teacher that you have completed the homework for this lesson. In this lesson and in future lessons, there is no further need to send the repository to your teacher. Simply notify your teacher each time you complete your homework and have pushed the changes to your remote repository.
See Also
- How to create a project in GitLab (GitLab Docs)
- Getting a Git Repository (Pro Git, Second Edition)
- Working with Remotes (Pro Git, Second Edition)
- Syncing (Atlassian Git Tutorials)
- Cloning repositories (GitHowTo)
- Fetching changes (GitHowTo)
- Merging pulled changes (GitHowTo)
- Submitting changes (GitHowTo)
- Resolving Conflicts (GitHowTo)
References
Resources
Acknowledgments
- Images are from Pro Git, Second Edition, licensed under the Creative Commons Attribution 3.0 Unported License.